
![]()
How to correct too much depth of field
![]()
This Tutorial shows how you can adjust the background and the strobe position with Photoshop 7.
Many other image processing tools offer similar functionality to improve your photos.
| Before | After | |||
 |
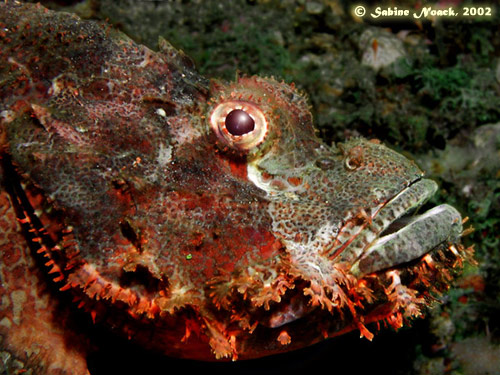 | |||
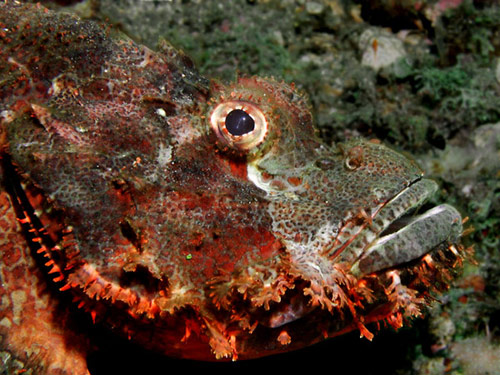
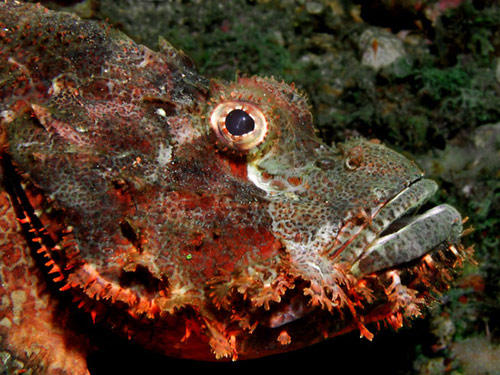
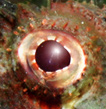
| Problem: | The Scorpion fish in this picture is hard to distinguish from the reef in the background. |
| Reason 1: | At F8 the bigger depth of field results in a focused background. F2.8 and 1/500s would have blurred and darkened it. Macro mode would have been a good idea too. |
| Reason 2: | Taking the picture from a lower angle and with a lower strobe position would have cast a nice shadow on the background and enhance the whiskers of the fish.
Unfortunately this was not possible without digging a hole in the reef. |
| Solution: | Darken and blur the background and add a simulated strobe from a lower position |
Step 1: Select the background
| Use the lasso to capture as much background as possible.
Then switch to mask mode and use a very small brush (size 1 or 3) to select details. |
 |
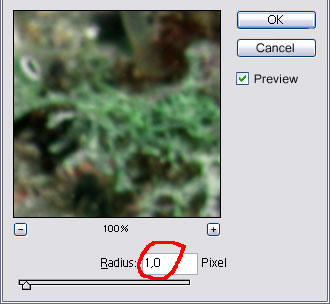
Step 2: Blur the background
| Use a Gaussian Blur filter with a radius of 1,0 to blur the background.
Don't go over the top here, too much blur won't look natural anymore. Make sure you apply the filter to the selected background only ! |
 |
This looks a bit better but the background should be darker
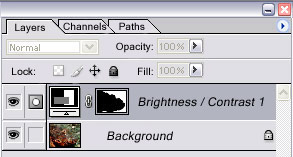
Step 3: Darken the background by adjusting Brightness and Contrast
| Create a new adjustment layer for Brightness and Contrast (Layers menu).
Make sure the layer is chained to the selection mask as shown here ! By clicking on the small eye symbol left of the layer you can switch the adjustment on and off. |
 | |
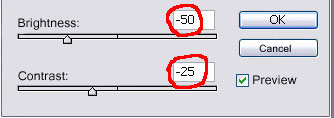
| Set Brightness to -50 and Contrast to -25
Using even higher reduction values leads to a too dark and unnatural looking background. |
 |
The background looks better now but it still could be a darker
Step 4: Darken the background with a Selective Color adjustment
Another way to darken or light up a picture is a selective color adjustment of the color Gray.
Before we can do this we need to reactivate our selection mask of the background, which is currently bound to the Brightness/Contrast adjustment layer.
| First select the background layer, right click on the mask symbol in the adjustment layer above and add the mask to the selection (2nd command in the PS7 pop up menu).
The outline of the mask should now reappear in your image. Now create another adjustment layer for Selective Color. Make sure this layer is also chained to the selection mask ! |
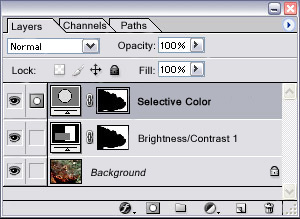 | |
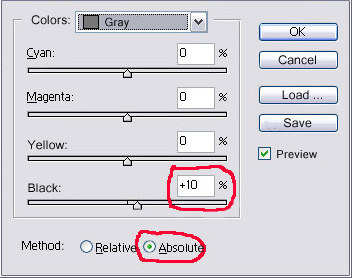
| In the Selective Color dialog, choose Gray in the Colors Choice, increase Black by 15 and select Absolute as Method.
Next choose Black as color and increase Black by 5. |
 |
The background is now slightly blurred and dark enough to be unobtrusive.
We don't need our adjustment layers anymore now, i.e. it's time to reduce the image to the background layer (Layers menu)
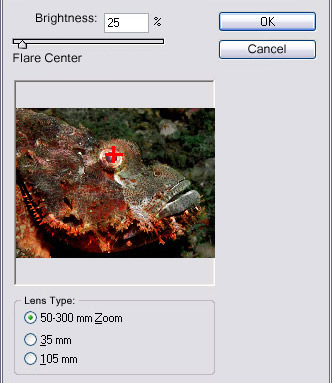
Step 5: Add a Lens Flare filter to the eye
| A lens flare positioned on top of the reflection of the strobe in the eye will add brilliance.
The Lens Flare filter is hidden in Filters menu: Rendering Filters: Lens Flare. In the dialog move the tiny target to the upper right part of the eye and set the other values as shown here to create the desired effect. |
 |
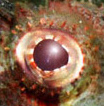 |
The lens flare is nice, but now the eye looks kind of milky.
To correct this, simply select the eye, add a new adjustment layer for Selective Color and darken the Grey (+10) and Black (+20) colors (as described in Step 4). Now that's the lens flare we were thinking of :-) --> |
 |
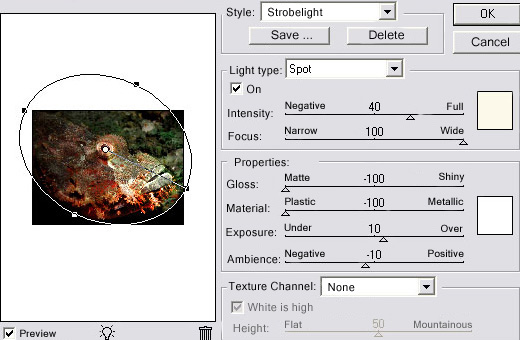
Step 6: Simulate another strobe position
By simulating another position of the strobe, we can put even more emphasis on the Scorpion fish. We will use a Lighting Effects filter on a copy of the background layer.
Don't forget to create that copy of the background layer and select it in the layers palette. Next choose Rendering Filters: Lighting Effects from the Filters menu.
Set the Style to Strobe and the Light Type to Spot. Adjust the color, center and direction of the light as well as the other properties as shown here to create the desired effect and keep in mind that the direction of the light should match the angle of the lens flare
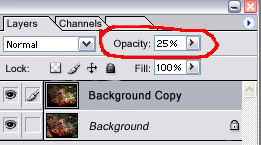
The strobe filter created the desired new highlights but it also created some unwanted side effects:
The image shows some blown out highlights on the fish and the lower part of the picture is much too dark.

| Fortunately we applied the filter to a copy of our background layer, where we can simply decrease the Opacity (down to 25%) to create a more natural effect.
There is nothing more to do now and ... |
 |
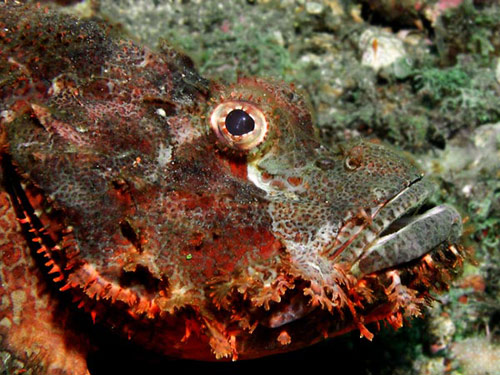
Here is the final result:
Remember
Please don't forget to mention corrections and improvements when you publish your pictures ;-)
 |
Text and Photos: © Sabine Noack, November 2002. | |