
![]()
Levels and Level Adjustment Basics
![]()
When i started to adjust my scanned slides with image processing software some years ago, the first thing i always tried was the auto-adjustment function. In some cases the photo improved a lot and in others it was looking ridiculous. Things didn't turn better when i bought a digital camera and moved on to Photoshop.
Many underwater photos published in the internet also suffer from "over adjustment", i.e. their coloring isn't natural anymore.
I never visited a Photoshop class and the Books i have don't say much about balancing, auto adjustment and levels adjustment. To make things worse, none of the many tutorials, i've read about photo retouche with several different image processing tools, used underwater photos to demonstrate adjustment.
Many underwater photos have a rather specific coloring (i.e. they are kind of weak on the Red side) that is a bit different from land photos and the rules for adjusting land photos don't always produce good results. The same goes for all those auto adjustment features, because they seem to be optimized for land photos too.
In order to really improve your photos with the levels tool (or however it is called in your software), you need to:
- understand what levels are,
- have an idea how levels adjustment changes your photos,
- and learn the limits of Auto Adjustment
There are some sample color tables at the end of this page, that you can use as a reference.
I've also written a tutorial about Automatic and Manual Levels Adjustment, using some of my own photos that definitely needed levels adjustment. Although i'm using Photoshop in all Basics and Tutorials, much of what i'm saying is also useful for other image processing software tools.
In Photoshop the function of contrast stretching is called Levels.
Many other image processing programs have similar functions with different names. In MS Photo Editor, it is called Balance (and AutoBalance), ...
In an 8 bit system, pixels in an image can run in values from 0 to 255 for each RGB (Red, Green and Blue) channel. The levels histograms displayed in the levels dialog are simply graphs of levels versus pixel count.
For example, in the red channel, the minimum value of 0 is the darkest possible red (which is black) and the maximum value of 255 is the highest possible red (which is white). The same goes for the other two channels.
Contrast stretching occurs when the pixels in an image that occupy less than the full range of 256 levels are stretched out so they more fully occupy the 256 range. Contrast stretching can result in blacker blacks, whiter whites, more saturated colors and overall higher contrast.
This is usually a good thing but sometimes the levels in an image are spread in an awkward way and levels adjustment results in unnatural colors, blown out highlights and lost shadow detail.
Levels in Photoshop:
The Photoshop Levels tool has Options, where you can define settings for auto adjustment and it also gives you the chance to white balance your pictures by choosing dark, medium and light neutrals in a photo and adjusting their RGB values (not part of this tutorial).
Creating an adjustment layer for Levels allows you to correct your changes several times until you are happy with the result.
BTW, many Photoshop users prefer other tools, like Curves over Levels, because they allow you to do similar adjustments.
Please refer to the documentation of your image processing software, to learn how to invoke and operate it's levels tool.
Understanding Levels Adjustment ...
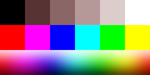
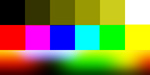
The following examples should give you an idea, how changing the in- and output levels of the different channels will change the colors, saturation and luminance of your photos.
The image is a simple combination of base colors and it's histograms look a bit like ragged teeth, but it will do the job.

For each adjustment, the corresponding values in the levels dialog are given in this form: Ch: RGB; IL: 0 - 1,0 - 255; OL: 0 - 255 |
 |
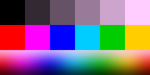
Increasing the Input Level Shadow Value:
Gaps on the left side of a Histogram are closed by increasing the input level shadow value.
The adjusted image is darker and we are loosing detail in the shadows, if we only adjust the combined RGB channel. The image is also shifted to the channel's opposite color (i.e. Cyan, Magenta or Yellow), if we adjust only the Red, Green or Blue channel.
Increasing the input level shadow value in RGB from 0 to 100 means:
All pixel values of the Red, Green and Blue channel that were <= 100 are now mapped to 0 (i.e. Black). Pixel values > 100 need to be recalculated to cover the full range again, i.e. they will be decreased accordingly and only very high pixel values (close to 255) will remain the same.
If we adjust only one channel, the new mapping will be limited to the pixel values of this channel and the other two channels remain untouched. Each channel can be adjusted separate from the others and all kinds of different adjustments in different channels can be combined.
| Ch: RGB; IL: 0 - 1,0 - 255; OL: 0 - 255 | Ch: RGB; IL: 100 - 1,0 - 255; OL: 0 - 255 |
|
 |
| Ch: Red; IL: 100 - 1,0 - 255; OL: 0 - 255 | Ch: Red and Blue; IL: 100 - 1,0 - 255; OL: 0 - 255 |
 |
 |
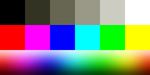
Decreasing the Input Level Highlight Value:
Gaps on the right side of a Histogram are closed by decreasing the input level highlight value.
The adjusted image is brighter and we are loosing detail in the highlights (sometimes even creating blown out highlights), if we only adjust the combined RGB channel. The image is also shifted to the channel's color (i.e. Red, Green or Blue), if we adjust only the Red, Green or Blue channel.
Decreasing the input level highlight value in RGB from 255 to 155 means:
All pixel values of the Red, Green and Blue channel that were >= 155 are now mapped to 255 (i.e. White). Pixel values < 155 need to be recalculated to cover the full range again, i.e. they will be increased accordingly and only very low pixel values (close to 0) will remain the same.
| Ch: RGB; IL: 0 - 1,0 - 255; OL: 0 - 255 | Ch: RGB; IL: 0 - 1,0 - 155; OL: 0 - 255 |
|
 |
Changing the Input Level Midtone Value:
Changing the input level midtone value doesn't close gaps at the ends of the shadows or highlights, but redefines the pixel values by shifting the midtone center value.
The adjusted image is again darker or brighter and we are loosing detail in the shadows or highlights, if we only adjust the combined RGB channel. We also shift the color balance, if we adjust only the Red, Green or Blue channel.
Increasing the input level midtone value brightens the image, but decreases contrast in the highlights, because the higher pixel values are now spread over a wider area of the total range. Decreasing the input level midtone value gives more room to the lower pixel values, darkens the image and decreases contrast in the shadows.
All pixel values, except the very high and low ones need to be recalculated to match into the new range.
| Ch: RGB; IL: 0 - 1,0 - 255; OL: 0 - 255 | Ch: RGB; IL: 0 - 0,5 - 255; OL: 0 - 255 |
|
 |
| Ch: RGB; IL: 0 - 1,5 - 255; OL: 0 - 255 | Ch: Red; IL: 0 - 1,5 - 255; OL: 0 - 255 |
 |
 |
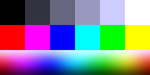
Increasing the Output Level Shadow Value:
Increasing the output level shadow value has the opposite effect of changing the input level. Now we don't stretch but narrow the range and we redefine the darkest pixel values.
The adjusted image is brighter and less saturated and we are loosing the darkest shadows and detail in the midtones, if we only adjust the combined RGB channel. The image is also shifted to the channel's color (i.e. Red, Green or Blue), if we adjust only the Red, Green or Blue channel.
Increasing the output level shadow value in RGB from 0 to 100 means:
All pixel values of the Red, Green and Blue channel that were <= 100 are now mapped to 100 (i.e. Black is lost now). Pixel values > 100 need to be recalculated to cover the full range again, i.e. they will be increased accordingly and only very high pixel values (close to 255) will remain the same. The example shows, that by changing the output level shadows we also brightened the six base colors.
| Ch: RGB; IL: 0 - 1,0 - 255; OL: 0 - 255 | Ch: RGB; IL: 0 - 1,0 - 255; OL: 100 - 255 |
|
 |
Decreasing the Output Level Highlight Value:
Decreasing the output level highlight value again has the opposite effect of changing the input level. Here we also narrow the range, but we redefine the brightest pixel values.
The adjusted image is darker and we are loosing the brightest highlights and detail in the midtones, if we only adjust the combined RGB channel. The image is also shifted to the channel's opposite color (i.e. Cyan, Magenta or Yellow), if we adjust only the Red, Green or Blue channel.
Decreasing the output level highlight value in RGB from 255 to 155 means:
All pixel values of the Red, Green and Blue channel that were >= 155 are now mapped to 155 (i.e. White is lost now). Pixel values < 155 need to be recalculated to cover the full range again, i.e. they will be decreased accordingly and only very low pixel values (close to 0) will remain the same. The example shows, that by changing the output level highlights we also darkened the six base colors.
| Ch: RGB; IL: 0 - 1,0 - 255; OL: 0 - 255 | Ch: RGB; IL: 0 - 1,0 - 255; OL: 0 - 155 |
|
 |
Adjusting the combined RGB channel:
By changing the levels in the combined RGB channel, we darken or light up our image and increase contrast and saturation, but we don't change the color balance.
 |
 |
C: RGB; IL: 25 - 1,0 - 230; OL: 0 - 255
Clipping the shadows (+25) and highlights (-25) in the RGB channel increased the overall contrast but we also lost detail in the dark shadows and the bright highlights. |
Adjusting the Red channel:
Here we don't darken or light up the image as much as in the RGB channel because our adjustment affects only the Red pixel values, but we are now changing the color balance by shifting pixels to Red or Cyan, which is the opposite of Red.
The problem is that many underwater pictures seem to have almost no Red, but there is some invisible Red in many pixels, that will suddenly pop up. In some cases this helps to bring out the colors of the reef, but it is also the reason, why dark gray wetsuits turn to dark red, light gray parts in the skin of dolphins or sharks turn to an unnatural pink in "over adjusted" photos.
|
 |
C: Red; IL: 100 - 1,0 - 0; OL: 0 - 255
Clipping the shadows (+100) in the Red channel shifted the image to Cyan. Gaining Cyan means loosing Red and to some extent also gaining Blue and Green and loosing Magenta and Yellow. |
|
 |
C: Red; IL: 0 - 1,0 - 155; OL: 0 - 255
Clipping the highlights (-100) in the Red channel shifted the image to Red. Gaining Red means loosing Cyan and to some extent also gaining Magenta and Yellow and loosing Blue and Green. |
Adjusting the Green channel:
Changes in the Green channel affect only the Green pixel values, and we are now changing the color balance by shifting pixels to Green or Magenta, which is the opposite of Green.
Most underwater pictures have some visible Green, but few Magenta only. You might want to add Magenta to get rid of Green colored water, but you also have to be careful again, otherwise Magenta will pop up in unexpected places.
|
 |
C: Green; IL: 100 - 1,0 - 0; OL: 0 - 255
Clipping the shadows (+100) in the Green channel shifted the image to Magenta. Gaining Magenta means loosing Green and to some extent also gaining Blue and Red and loosing Cyan and Yellow. |
|
 |
C: Green; IL: 0 - 1,0 - 155; OL: 0 - 255
Clipping the highlights (-100) in the Green channel shifted the image to Green. Gaining Green means loosing Magenta and to some extent also gaining Cyan and Yellow and loosing Blue and Red. |
Adjusting the Blue channel:
Changes in the Blue channel affect only the Blue pixel values, and we are now changing the color balance by shifting pixels to Blue or Yellow, which is the opposite of Blue.
Most underwater pictures have lots of visible Blue but few Yellow only. You might want to subtract Yellow to get rid of Green colored water, but then your buddy's Yellow fins will turn Green.
|
 |
C: Green; IL: 100 - 1,0 - 0; OL: 0 - 255
Clipping the shadows (+100) in the Blue channel shifted the image to Yellow. Gaining Yellow means loosing Blue and to some extent also gaining Green and Red and loosing Cyan and Magenta. |
|
 |
C: Green; IL: 0 - 1,0 - 155; OL: 0 - 255
Clipping the highlights (-100) in the Blue channel shifted the image to Blue. Gaining Blue means loosing Yellow and to some extent also gaining Cyan and Magenta and loosing Green and Red. |
Now you know what happens to your photo, when you start to move all those sliders in the different channels.
The Auto Levels function (Image: Adjust: Auto Levels or use the Auto button in the Levels Dialog) simply tries to cover the full range for all pixels in the Red, Green and Blue channels by closing gaps on both sides, ignoring small amounts of existing pixel values.
Photoshop also offers an Auto Contrast function, that adjusts the combined RGB channel only and an Auto Color function, that adjusts Red, Green and Blue by considering existing darkest and brightest pixel values.
Many photos show small to medium gaps on the highlight and shadow sides in the histograms of one or more channels. Here are (a bit exaggerated) examples of the Red, Green and Blue channels, after Auto Levels closed those gaps:
|
 |
Channel: Red; IL: 100 - 1,0 - 155; OL: 0 - 255
Clipping the shadows and highlights in the Red channel means shifting the shadows to Cyan and the highlights to Red. This may help to enhance colored parts of the reef, but looks very unnatural on a dolphin. |
|
 |
Channel: Green; IL: 100 - 1,0 - 155; OL: 0 - 255
Clipping the shadows and highlights in the Green channel means that the shadows are shifted to Magenta and the highlights to Green, producing those small magenta spots that sometimes appear in dark parts of your photos and making the skin of your buddy look like a green alien. |
|
 |
Channel: Blue; IL: 100 - 1,0 - 155; OL: 0 - 255
Clipping the shadows and highlights in the Blue channel means shifting the shadows to Yellow and the highlights to Blue, resulting in ugly colored water and making the skin of your buddy look pale. |
Reading Histograms:
Here is another typical example (from Photo 1 of the Levels Tutorial) of auto adjusting the levels in the Red channel.
Note that the original histogram shows a big gap on the highlight side, indicating that all our reds are darker than the medium midtones, i.e. almost invisible.
In the auto adjusted version of the histogram the pixels are evenly spread across the full range and now there are visible reds in the midtones and highlights.
 |
 |
Looking at the histograms can help you to determine, whether Auto levels will improve your photo or make it worse.
Auto Levels usually works very well with images, where the histograms of all 3 channels cover a similar area in the midtone range and show smaller gaps in the shadows and/or highlights.
Be careful, when the 3 colors cover different areas and/or the histograms show large gaps in the shadows and/or highlights. Here Auto Levels will make up colors that don't belong into the photo. Large gaps in the shadows also result in a loss of detail in the dark areas, whereas large gaps in the highlights will result in blown out highlights in the adjusted image.
In these cases, it is better to manually adjust the levels of your photo.
If you're interested to see examples of automatic and manually adjusted levels of some underwater photos, have a look at my Levels Tutorial
The following samples should give you an overview of color, contrast and saturation changes for the different channels.
RGB Channel
| 0 - 1,0 - 255; 0 - 255 | 50 - 1,0 - 255; 0 - 255 | 100 - 1,0 - 255; 0 - 255 | 225 - 1,0 - 255; 0 - 255 |
|
 |
 |
 |
| 0 - 1,0 - 255; 0 - 255 | 0 - 0,8 - 255; 0 - 255 | 0 - 0,5 - 255; 0 - 255 | 0 - 0,1 - 255; 0 - 255 |
|
 |
 |
 |
| 0 - 1,0 - 255; 0 - 255 | 0 - 1,0 - 255; 0 - 205 | 0 - 1,0 - 255; 0 - 155 | 0 - 1,0 - 255; 0 - 30 |
|
 |
 |
 |
| 0 - 1,0 - 255; 0 - 255 | 0 - 1,0 - 205; 0 - 255 | 0 - 1,0 - 155; 0 - 255 | 0 - 1,0 - 30; 0 - 255 |
|
 |
 |
 |
| 0 - 1,0 - 255; 0 - 255 | 0 - 1,5 - 255; 0 - 255 | 0 - 5 - 255; 0 - 255 | 0 - 9 - 255; 0 - 255 |
|
 |
 |
 |
| 0 - 1,0 - 255; 0 - 255 | 0 - 1,0 - 255; 50 - 255 | 0 - 1,0 - 255; 100 - 255 | 0 - 1,0 - 255; 225 - 255 |
|
 |
 |
 |
Red Channel
| 0 - 1,0 - 255; 0 - 255 | 50 - 1,0 - 255; 0 - 255 | 100 - 1,0 - 255; 0 - 255 | 225 - 1,0 - 255; 0 - 255 |
|
 |
|
 |
| 0 - 1,0 - 255; 0 - 255 | 0 - 0,8 - 255; 0 - 255 | 0 - 0,5 - 255; 0 - 255 | 0 - 0,1 - 255; 0 - 255 |
|
 |
 |
 |
| 0 - 1,0 - 255; 0 - 255 | 0 - 1,0 - 255; 0 - 205 | 0 - 1,0 - 255; 0 - 155 | 0 - 1,0 - 255; 0 - 30 |
|
 |
 |
 |
| 0 - 1,0 - 255; 0 - 255 | 0 - 1,0 - 205; 0 - 255 | 0 - 1,0 - 155; 0 - 255 | 0 - 1,0 - 30; 0 - 255 |
|
 |
|
 |
| 0 - 1,0 - 255; 0 - 255 | 0 - 1,5 - 255; 0 - 255 | 0 - 5 - 255; 0 - 255 | 0 - 9 - 255; 0 - 255 |
|
 |
 |
 |
| 0 - 1,0 - 255; 0 - 255 | 0 - 1,0 - 255; 50 - 255 | 0 - 1,0 - 255; 100 - 255 | 0 - 1,0 - 255; 225 - 255 |
|
 |
 |
 |
Green Channel
| 0 - 1,0 - 255; 0 - 255 | 50 - 1,0 - 255; 0 - 255 | 100 - 1,0 - 255; 0 - 255 | 225 - 1,0 - 255; 0 - 255 |
|
 |
|
 |
| 0 - 1,0 - 255; 0 - 255 | 0 - 0,8 - 255; 0 - 255 | 0 - 0,5 - 255; 0 - 255 | 0 - 0,1 - 255; 0 - 255 |
|
 |
 |
 |
| 0 - 1,0 - 255; 0 - 255 | 0 - 1,0 - 255; 0 - 205 | 0 - 1,0 - 255; 0 - 155 | 0 - 1,0 - 255; 0 - 30 |
|
 |
 |
 |
| 0 - 1,0 - 255; 0 - 255 | 0 - 1,0 - 205; 0 - 255 | 0 - 1,0 - 155; 0 - 255 | 0 - 1,0 - 30; 0 - 255 |
|
 |
|
 |
| 0 - 1,0 - 255; 0 - 255 | 0 - 1,5 - 255; 0 - 255 | 0 - 5 - 255; 0 - 255 | 0 - 9 - 255; 0 - 255 |
|
 |
 |
 |
| 0 - 1,0 - 255; 0 - 255 | 0 - 1,0 - 255; 50 - 255 | 0 - 1,0 - 255; 100 - 255 | 0 - 1,0 - 255; 225 - 255 |
|
 |
 |
 |
Blue Channel
| 0 - 1,0 - 255; 0 - 255 | 50 - 1,0 - 255; 0 - 255 | 100 - 1,0 - 255; 0 - 255 | 225 - 1,0 - 255; 0 - 255 |
|
 |
|
 |
| 0 - 1,0 - 255; 0 - 255 | 0 - 0,8 - 255; 0 - 255 | 0 - 0,5 - 255; 0 - 255 | 0 - 0,1 - 255; 0 - 255 |
|
 |
 |
 |
| 0 - 1,0 - 255; 0 - 255 | 0 - 1,0 - 255; 0 - 205 | 0 - 1,0 - 255; 0 - 155 | 0 - 1,0 - 255; 0 - 30 |
|
 |
 |
 |
| 0 - 1,0 - 255; 0 - 255 | 0 - 1,0 - 205; 0 - 255 | 0 - 1,0 - 155; 0 - 255 | 0 - 1,0 - 30; 0 - 255 |
|
 |
|
 |
| 0 - 1,0 - 255; 0 - 255 | 0 - 1,5 - 255; 0 - 255 | 0 - 5 - 255; 0 - 255 | 0 - 9 - 255; 0 - 255 |
|
 |
 |
 |
| 0 - 1,0 - 255; 0 - 255 | 0 - 1,0 - 255; 50 - 255 | 0 - 1,0 - 255; 100 - 255 | 0 - 1,0 - 255; 225 - 255 |
|
 |
 |
 |
 |
Text and Images: © Sabine Noack, December 2002. | |