Photo 1: School of Jacks
| About: |
This picture was taken at the wreck of the Liberty in Tulamben, Bali. It shows a small part of a huge resident school of Jacks. |
| Setting: |
Manual: ISO 100, F5, 1/125s, focal length 6,6mm, strobe set to half power |
| Problem: |
The visibility was not very good (~15m) and i was too far away when i took this shot.
The original photo is dull with a heavy cyan cast. |
The original photo (resized to 375 * 500) ...
 |
Original Histograms:
Red is limited to the dark pixels in the photo with very low midtones and highlights (danger of adding too much red and causing blown out highlights !), whereas Green and Blue are found in the lighter midtone range (!!!), both showing large gaps on the left (danger: watch the color of the water !) and small gaps on the right side (no problem).
Auto Levels will cause problems here. |
 |
 |
 |
After applying Auto Levels ...
the contrast and saturation are much better now, but unfortunately we also created lots of blown out highlights in our picture, the water is now gray with small magenta colored dots and the skin of the jacks has turned pink, which is not natural.
 |
New Auto Levels Values:
Red:
IL: 3 - 1,0 - 96;
OL: 0 - 255
Green:
IL: 110 - 1,0 - 206;
OL: 0 - 255
Blue:
IL: 120 - 1,0 - 209;
OL: 0 - 255
If you want to see the changed histograms, simply download the original photo, open the levels dialog (in an adjustment layer ;-), press the Auto button and look at the changes in the Red, Green and Blue channels.
|
Manual Levels Adjustment ...
A careful manual adjustment of the levels in each single channel leads to a more natural looking image. It is important to do this in an adjustment layer, because you will need to correct the settings (especially those of the Red channel) several times.
With this photo it is not possible to cover the full range without creating false colors, blown out highlights, .... There are other tools that might help us here, like Selective Color. And don't forget that you can adjust the midtones and the output levels too.
 |
My Manual Levels Values:
Red:
IL: 0 - 0,95 - 170;
OL: 0 - 220
Green:
IL: 100 - 0,95 - 225;
OL: 0 - 245
Blue:
IL: 110 - 1,05 - 220;
OL: 0 - 250
If you want to see the changed histograms, simply download the original photo, open the levels dialog (in an adjustment layer ;-), press the Auto button and look at the changes in the Red, Green and Blue channels.
|
Further Improvements ...
I added an adjustment layer for Selective Color adjustment and used the healing brush on some of the blown out highlights and pink fish skin. Maybe i'll describe this in another tutorial.
Here is my final version:

Photo 2: Moon Wrasse
| About: |
This picture was also taken at the wreck of the Liberty in Tulamben, Bali. It shows a Moon wrasse looking for lunch in the black sand. |
| Setting: |
Manual: ISO 100, F5, 1/125s, focal length 19,1 mm, strobe set to full power |
| Problem: |
The photo is overexposed and looking washed out. |
The original photo (resized to 500 * 375) ...

 |
Original Histograms:
Red:
is stretched nicely in the midtone range, but there is a huge gap in the shadows and we have few Reds in the highlights.
Green:
is stretched over a smaller area in the midtone range, with a huge gap in the shadows and very low highlights.
Blue:
is similar to green but stretched over an even smaller area in the midtone range, with a huge gap in the shadows and very low highlights.
Auto Levels should work well here, because all 3 channels cover a similar area. The gaps in the shadow show the overexposure and will probably cause no harm. The gaps in the highlights might cause some blown out highlights. |
 |
 |
After applying Auto Levels ...
This is looking very good already. On a closer look, the sand in the upper part of the photo is too cyan and in the lower part it is too red. We also lost detail in the green cheek of the wrasse.
 |
New Auto Levels Values:
Red:
IL: 85 - 1,0 - 239;
OL: 0 - 255
Green:
IL: 108 - 1,0 - 220;
OL: 0 - 255
Blue:
IL: 115 - 1,0 - 208;
OL: 0 - 255
If you want to see the changed histograms, simply download the original photo, open the levels dialog (in an adjustment layer ;-), press the Auto button and look at the changes in the Red, Green and Blue channels.
|
Manual Levels Adjustment ...
A slightly more conservative manual adjustment of the levels in each single channel solved most of our problems. The color of the sand is better and we kept the detail in the green cheek.
Again i suggest that you create an adjustment layer for Levels, allowing you to balance and correct the settings several times.
With this photo we covered almost the full range without creating unwanted side effects, because all colors were evenly spread around the center of the original histograms.
The photo doesn't really need further adjustment (and probably isn't worth the effort).
 |
My Manual Levels Values:
Red:
IL: 75 - 1 - 235;
OL: 0 - 255
Green:
IL: 90 - 1 - 230;
OL: 0 - 255
Blue:
IL: 105 - 1 - 210;
OL: 0 - 255
If you want to see the changed histograms, simply download the original photo, open the levels dialog (in an adjustment layer ;-), press the Auto button and look at the changes in the Red, Green and Blue channels.
|
Further Improvements ...
As usual i added an adjustment layer for Selective Color, another one to increase the saturation of Green and finally i added a copy of the background layer with 25% soft light.
Here is my final version:

Photo 3: Soft Coral
| About: |
This picture was taken at the Alam Anda house reef, Sambirentreng, Bali. It shows a red soft coral with white polyps and a small Golden damsel in front of a blue (?) background. |
| Setting: |
Manual: ISO 100, F2,8, 1/320s, focal length 8,3mm, strobe set to half power |
| Problem: |
In this shot i tried to combine ambient and strobe light, but the strobe was too weak at half power and i positioned it much too low.
The original photo has a very heavy cyan cast. |
The original photo (resized to 375 * 500) ...
 |
Original Histograms:
Red is high in the shadows and very low in the midtone range with a huge gap in the highlights (danger of adding too much red and causing blown out highlights !), Green and Blue are unevenly stretched over the whole range, both have a gap in the shadows (might cause problems with the color of the water !) and are very low in the highlights.
Auto Levels will cause problems here. |
 |
 |
 |
After applying Auto Levels ...
The lower half of the picture is now much too Red. We should have expected this, after examining at the original histogram for Red. The small Golden damsel is now Orange with a big blown out highlight on her belly and the water in the background has lost saturation and gained noise.
This is a typical example of a photo, where Auto Levels is the wrong choice.
 |
New Auto Levels Values:
Red:
IL: 0 - 1,0 - 108;
OL: 0 - 255
Green:
IL: 25 - 1,0 - 230;
OL: 0 - 255
Blue:
IL: 28 - 1,0 - 231;
OL: 0 - 255
If you want to see the changed histograms, simply download the original photo, open the levels dialog (in an adjustment layer ;-), press the Auto button and look at the changes in the Red, Green and Blue channels.
|
Manual Levels Adjustment ...
Although my manual adjustment improved this photo in making it look more natural, it is now too dark and the white polyps are still cyan. There is no way to change this in the levels tool, without adding more red in places where it doesn't belong to.
When you look at my manual level values, you see that i fully cover the range for Green and even clipped existing Blue on the highlight side, but it simply isn't possible to adjust Red. I also adjusted the midtones and the output levels, but i'm still not happy with the outcome.
 |
My Manual Levels Values:
Red:
IL: 0 - 1,2 - 175;
OL: 5 - 245
Green:
IL: 20 - 0,8 - 230;
OL: 0 - 255
Blue:
IL: 25 - 1,1 - 220;
OL: 0 - 255
If you want to see the changed histograms, simply download the original photo, open the levels dialog (in an adjustment layer ;-), press the Auto button and look at the changes in the Red, Green and Blue channels.
|
Further Improvements ...
I added an adjustment layer for Selective Color and a copy of the background layer with 33% soft light. The photo still doesn't really look good, but at least it is presentable now.
Here is my final version:

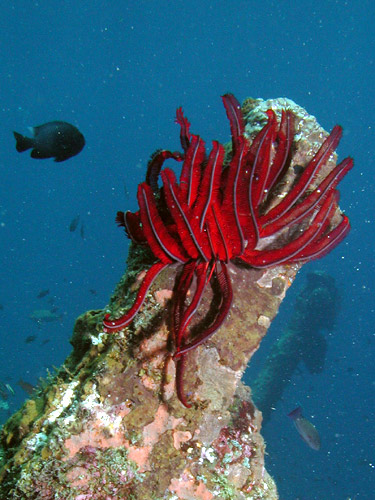
Photo 4: Crinoid
| About: |
This picture was taken at the wreck of the Liberty, Tulamben, Bali. It is already cropped and shows a red crinoid, sitting on an exposed part of the wreck. |
| Setting: |
Manual: ISO 100, F8, 1/200s, focal length 7,0mm, strobe set to half power |
| Problem: |
The photo is underexposed and the color of the water is rather ugly. F5, 1/1000s and full strobe would have been a better choice here. Shooting the photo from a lower angle would have looked more interesting.
It also has some backscatter, that needs to be removed, but that's not part of this tutorial. |
The original photo (resized to 375 * 500) ...
 |
Original Histograms:
Red is stretched unevenly across the shadows and midtone range, but very low in the highlights (might cause blown out highlights !), Green and Blue both cover a similar area the shadows and midtones with a small gap in the shadows. Like Red they are very low in the highlights.
All curves cover more or less the same range, i.e. Auto Levels will probably improve the image. |
 |
 |
 |
After applying Auto Levels ...
The original histograms all covered more or less the same range, indicating that Auto Levels will not add wrong colors. The image will be brightened, because all histograms are lacking highlights.
Contrast and saturation of the adjusted image are clearly improved but we also notice some blown out highlights, the backscatter is more visible now and the color of the water is still not as blue as we'd like it to be.
This is a typical example of a photo, where Auto Levels is a good choice, although further improvement is possible.
 |
New Auto Levels Values:
Red:
IL: 0 - 1,0 - 108;
OL: 0 - 255
Green:
IL: 25 - 1,0 - 230;
OL: 0 - 255
Blue:
IL: 28 - 1,0 - 231;
OL: 0 - 255
If you want to see the changed histograms, simply download the original photo, open the levels dialog (in an adjustment layer ;-), press the Auto button and look at the changes in the Red, Green and Blue channels.
|
Manual Levels Adjustment ...
Here i started with the auto adjustment settings, but decreased the levels in the Green and Blue highlights. I also corrected the Green midtones to shift the color of the water a bit to Blue.
I accepted the visible backscatter and the lost detail in the white patches on the wreck, because these can be corrected later on.
 |
My Manual Levels Values:
Red:
IL: 0 - 1,0 - 210;
OL: 0 - 255
Green:
IL: 10 - 0,9 - 175;
OL: 0 - 255
Blue:
IL: 20 - 1 - 155;
OL: 0 - 255
If you want to see the changed histograms, simply download the original photo, open the levels dialog (in an adjustment layer ;-), press the Auto button and look at the changes in the Red, Green and Blue channels.
|
Further Improvements ...
I added the usual adjustment layer for Selective Color, got rid of the backscatter and applied the healing brush to the blown out highlights.
Here is my final version:

Photo 5: Green Anemone
| About: |
I took this photo at a dive site called Cannibal Rock, Rinca, Indonesia. It shows a green anemone with pink tipped tentacles. |
| Setting: |
Automatic: ISO 286, F11, 1/30s, focal length 6,6 mm, internal strobe |
| Problem: |
The photo is a bit underexposed and somehow too green. It also has several other faults, that i won't mention here ;-) |
The original photo (resized to 500 * 375) ...

 |
Original Histograms:
Red:
is stretched nicely across the shadow and midtone range, but the highlights are low and there is a gap on the right end (might cause blown out highlights !).
Green:
is stretched across the whole range, with a small gap in the shadows. It shows a peak in the shadows and it is much lower in the highlights.
Blue:
is similar to Red but its peak is located further to the left.
Auto Levels should work well here, because all 3 channels cover similar areas across the whole range. The low highlights and gaps on the right end indicate the underexposure and will probably cause some blown out highlights. |
 |
 |
After applying Auto Levels ...
This is looking much better. On a closer look, the base of the anemone turned dark brown and the tips are a bit too magenta. We also lost too much color in the arms of the green crinoid on the upper left side of the image.
 |
New Auto Levels Values:
Red:
IL: 11 - 1,0 - 187;
OL: 0 - 255
Green:
IL: 20 - 1,0 - 237;
OL: 0 - 255
Blue:
IL: 8 - 1,0 - 203;
OL: 0 - 255
If you want to see the changed histograms, simply download the original photo, open the levels dialog (in an adjustment layer ;-), press the Auto button and look at the changes in the Red, Green and Blue channels.
|
Manual Levels Adjustment ...
Again a slightly more conservative manual adjustment of the levels in each single channel solved most of the problems. The color of the base of the anemone is better, the pink tips are looking more natural and we kept the detail in the green crinoid.
Don't forget to create an adjustment layer for Levels, allowing you to balance and correct the settings several times.
The photo doesn't really need further adjustment (and probably isn't worth the effort).
 |
My Manual Levels Values:
Red:
IL: 10 - 1 - 225;
OL: 0 - 255
Green:
IL: 15 - 1,1 - 245;
OL: 0 - 255
Blue:
IL: 5 - 1 - 220;
OL: 0 - 255
If you want to see the changed histograms, simply download the original photo, open the levels dialog (in an adjustment layer ;-), press the Auto button and look at the changes in the Red, Green and Blue channels.
|
Further Improvements ...
I decided that i liked the underexposed version better because now the improved background distracts from the anemone.
The anemone looks a bit unreal anyway, therefore i decided to make the background unobtrusive and as dark as possible and put more emphasis on the anemone by making it pop out. I added an adjustment layer for Selective Color to darken Black and Grey and enhance Green and Magenta, another one to increase the saturation of Green and Magenta and finally i added a copy of the background layer with 20% soft light.
Here is my final version:

Photo 6: Giant Frogfish
| About: |
This photo shows an orange Giant frogfish, decorated with crinoids and sitting on a tree trunk. I took it during a dive in Horseshoe Bay, Rinca, Indonesia. |
| Setting: |
Automatic: ISO 400, F11, 1/40s, focal length 8,8mm, internal strobe |
| Problem: |
The photo is underexposed and the green colored water (visibility was very bad) somehow suggests that this frogfish lives in the Baltic Sea. The strange camera settings are a result of my C3030Z's P-Mode and it is a miracle that the fish is in focus (the softness here is caused by resizing and compressing the photo). |
The original photo (resized to 375 * 500) ...
 |
Original Histograms:
Red is stretched unevenly across the shadows and midtone range and has a big gap in the highlights, Green and Blue both cover a similar area the shadows and midtones with a small gap in the shadows and they also have big gaps in the highlights (might cause blown out highlights !). Green is dominant.
All curves cover more or less the same range, i.e. Auto Levels will probably improve the image. |
 |
 |
 |
After applying Auto Levels ...
The original histograms all covered more or less the same range, which meant that Auto Levels didn't add wrong colors. The image was be brightened, because all histograms were lacking highlights.
Contrast and saturation of the adjusted image are much better now but we also created a lot of blown out highlights, the backscatter is more visible now and the color of the water is still an ugly green.
Using Auto Levels is a good choice here, although further improvement is necessary, because we won't get rid of the green water with the levels tool.
 |
New Auto Levels Values:
Red:
IL: 1 - 1,0 - 162;
OL: 0 - 255
Green:
IL: 19 - 1,0 - 164;
OL: 0 - 255
Blue:
IL: 15 - 1,0 - 154;
OL: 0 - 255
If you want to see the changed histograms, simply download the original photo, open the levels dialog (in an adjustment layer ;-), press the Auto button and look at the changes in the Red, Green and Blue channels.
|
Manual Levels Adjustment ...
I started with the auto adjustment settings, but decided to reset the shadow values to zero and increase the levels in the highlights to add detail again to the white parts of the crinoid arms. I also corrected the Green midtones and output level highlights to shift the color of the water a bit to Blue.
 |
My Manual Levels Values:
Red:
IL: 0 - 1,0 - 215;
OL: 0 - 255
Green:
IL: 15 - 0,9 - 205;
OL: 0 - 225
Blue:
IL: 10 - 1,1 - 200;
OL: 0 - 255
If you want to see the changed histograms, simply download the original photo, open the levels dialog (in an adjustment layer ;-), press the Auto button and look at the changes in the Red, Green and Blue channels.
|
Further Improvements ...
I added an adjustment layer for Selective Color to light up the grays and turn the green water blue, got rid of the backscatter, softened the noise in the background and added a copy of the background with 25% soft light. What a change !
Here is my final version:

Remember
Please don't forget to mention corrections and improvements when you publish your pictures ;-)
 |
 |
Text and Photos: © Sabine Noack, December 2002. |
